Tuesday, April 30, 2013

FM Stereo Transmitter

Youll find that this is a very easy project to build. It will transmit good quality sound in the FM band ( 88 - 108 mhz ). One inportant item is that the IC chip operates on 3 volts DC. The chip will get destroyed if it is operated on any voltage higher than 3.5 volts. The antenna can be a standard telescopic antenna or a 2 foot length of wire. The input is in the millivolt range and you may need to add additional pots for the inputs. I was able to use this circuit for a walkman and a portable CD player in my car. I used the headphone jack on both and varied the signal with the volume control.

Circuit Diagram

FM Stereo Transmitter Circuit Diagram
To adjust the circuit tune your FM radio to a quite spot then adjust the trimmer capacitor C8 until you hear the signal that you are transmiting. When you have a strong signal adjust the resistor R4 until the stereo signal indicator lights. If the input is to high of a signal you may over drive the IC chip. Use two 15 turn pots on the input signals to bring the level down. You can balance the signal by using headphones. The inductor L1 is 3 turns of .5 mm wire on a 5 mm ferrite core.
 
 
Sourced: extremecircuits
Continue reading...

Friday, April 26, 2013

LED Workbench Lighting

Here is a very useful workbench lights unit for electronics hobbyists. The transportable inspection lamp circuit consists of an on-board voltage regulator and a high-bright 5mm white LED. Any 9 to 18 volt dc rated ac mains adaptor, in a position to supply about a hundred mA of output present may additionally be used to energy this moveable inspection lamp.

After building the led workbench mild circuit will have to be enclosed in a suitable plastic bottle cap as illustrated here. The miniature lens proven is an not obligatory component. In the prototype, plastic made lens lifted from a discarded torch was used!
Circuit Project: LED workbench lighting

LED workbench lighting fixtures lamp circuit schematic
Circuit Project: LED workbench lighting
The adjustable 3-pin voltage regulator IC1 (LM317L) in TO-92 pack, is here tuned to produce an output of close to four.5 volt dc. This provide is straight away fed to the white LED (D2) during the present limiter resistor R3 (51 Ohm). Diode D1 (1N4001) works as an enter polarity safety guard and two small electrolytic capacitors (C1 and C2) related at the input and output pins of IC1 give a lift tos the overall steadiness of the regulator circuit. Use a regular RCA or EP socket because the enter terminal J1. 
Continue reading...

Saturday, April 13, 2013

Simple Steam Whistle

This circuit contains six square wave oscillators. Square waves are made up of a large collection of harmonics. If six square waves with different frequencies are introduced together, the end result will possible be a signal with an extraordinarily large collection of frequencies. When you take heed to the result you’ll find that it is rather much like a steam whistle. The circuit will have to be useful in modelling and even in a sound studio.
Circuit diagram :

Simple Steam Whistle Circuit Diagram

This circuit uses best two ICs. The first IC, a 40106, comprises six Schmitt set offs, that are all configured as oscillators. Different frequencies are generated by means of completely different remarks resistors. The output alerts from the Schmitt set offs are mixed via resistors. The ensuing signal is amplified by means of IC2, an LM386. This IC can deliver about 1 W of audio power, which will have to be adequate for most utilitys. If you allow out R13 and all parts after P1, the output can then be connected to a extra powerful amplifier. In this manner a very deafening steam whistle can be created. The ‘frequency’ of the sign may additionally be adjusted with P2, and P1 keep an eye ons the volume.


ecircuitslab.com
Continue reading...

Simple Detector with Amplification

A simple shortwave radio detector is neither very sensitive nor very selective. However, with a little extra amplification we can improve the reception performance significantly.

The additional circuit is designed to compensate for the losses in the resonant circuit. A transistor is used to amplify the RF signal and feed it back into the resonant circuit. When the gain is set correctly we can make the amount of this feedback exactly equal to the losses. The resonant circuit is then critically damped and has a very high Qfactor. Now we can separate transmissions that are just 10 kHz apart, and we can tune in to very weak stations.

Detector with Amplification Circuit Diagram :


Detector with Amplification-Circuit Diagram

The tuning capacitor used has two gangs of vanes with capacitances of 240 pF and 80 pF. These two gangs are connected in parallel to make a 320 pF variable capacitance. The air-cored inductor has 25 turns on a diameter of 10 mm, with taps at 5-turn intervals. The resonant circuit so formed is capable of covering the full shortwave  band from 5 MHz to 25 MHz.

The short wave detector can be connected to a power amplifier, or, for exam-ple, amplified PC loudspeakers. The antenna does not have to  be very long: in experiments we used a one metre length of wire. Tuning the radio involves adjusting the variable capacitor to bring in the station and then adjusting the gain of the feed-back circuit for optimal output volume. If the potentiometer is turned up too far, the receiver will go into self-oscillation and become a mini-transmitter. At  the optimal setting the sound  quality is very pleasant and certainly no worse than many ordinary shortwave radios.

If you find shortwave detectors that use a battery and an amplifier a little new-fangled, you can get your fix of nostalgia by dispensing with the battery and connecting a crystal earpiece to the detector’s output. The radio will of course also work without the feedback circuit, but with rather poorer performance.

Source : http://www.ecircuitslab.com/2012/08/a-simple-detector-with-amplification.html
Continue reading...

Step Up Booster Powers Eight White LEDs

Tiny white LEDs are capable of delivering ample white light without the fragility problems and costs associated with fluorescent backlights. They do pose a problem however in that their forward voltage can be as high as 4 V, precluding them being from powered directly from a single Li-Ion cell. Applications requiring more white LEDs or higher efficiency can use an LT1615 boost converter to drive a series connected array of LEDs. The high efficiency circuit (about 80%) shown here can provide a constant-current drive for up to eight LEDs. Driving eight white LEDs in series requires at least 29 V at the output and this is possible thanks to the internal 36-V, 350-mA switch in the LT1615.

The constant-current design of the circuit guarantees a steady current through all LEDs, regardless of the forward voltage differences between them. Although this circuit was designed to operate from a single Li-Ion battery (2.5V to 4.5V), the LT1615 is also capable of operating from inputs as low as 1 V with relevant output power reductions. The Motorola MBR0520 surface mount Schottky diode (0.5 A 20 V) is a good choice for D1 if the output voltage does not exceed 20 V. In this application however, it is better to use a diode that can withstand higher voltages like the MBR0540 (0.5 A, 40 V). Schottky diodes, with their low forward voltage drop and fast switching speed, are the best match.

Many different manufacturers make equivalent parts, but make sure that the component is rated to handle at least 0.35 A. Inductor L1, a 4.7-µH choke, is available from Murata, Sumida, Coilcraft, etc. In order to maintain the constant off-time (0.4 ms) control scheme of the LT1615, the on-chip power switch is turned off only after the 350-mA (or 100-mA for the LT1615-1) current limit is reached. There is a 100-ns delay between the time when the current limit is reached and when the switch actually turns off. During this delay, the inductor current exceeds the current limit by a small amount. This current overshoot can be beneficial as it helps increase the amount of available output current for smaller inductor values.


This will be the peak current passed by the inductor (and the diode) during normal operation. Although it is internally current-limited to 350 mA, the power switch of the LT1615 can handle larger currents without problems, but the overall efficiency will suffer. Best results will be o btained when IPEAK is kept well below 700 mA for the LT1615.The LT1615 uses a constant off-time control scheme to provide high efficiencies over a wide range of output current. The LT1615 also contains circuitry to provide protection during start-up and under short-circuit conditions.

When the FB pin voltage is at less than approximately 600 mV, the switch off-time is increased to 1.5 ms and the current limit is reduced to around 250 mA (i.e., 70% of its normal value). This reduces the average inductor current and helps minimize the power dissipation in the LT1615 power switch and in the external inductor L1 and diode D1. The output current is determined by Vref/R1, in this case, 1.23V/68 = 18 mA). Further information on the LT1615 may be found in the device datasheets which may be downloaded from www.linear-tech.com/pdf/16151fa.pdf
Author: D. Prabakaran
Copyright: Elektor Electronics
Continue reading...

Friday, April 12, 2013

2V to 25V Power Supply Schematic Rise


2V to 25 Power supply
This project makes use of a LM338 adjustable three terminal regulator to supply a current of up to 5A over a variable output voltage of 2V to 25V DC. It will come in handy to power up lots of electronic circuits when you are assembling or building any electronic devices. The schematic and parts list are designed for a power supply input of 240VAC. Change the ratings of the parts if 110VAC power supply input is necessary.

As shown in the figure above, the mains input is applied to the circuit through fuse F1. The fuse will blow if a current greater than 8A is applied to the method. Varistor V1 is used to clamp down any surge of voltage from the mains to protect the parts from breakdown. Transformer T1 is used to step down the incoming voltage to 24V AC where it is rectified by the diodes D1, D2, D3 & D4. Electrolytic capacitor E1 is used to smoothen the ripple of the rectified DC voltage.

Diodes D5 & D6 are used as a protection devices to prevent capacitors E2 & E3 from discharging through low current points in to the regulator. Capacitor C1 is used to bypass high frequency part from the circuit. Make definite that a large heat sink is mounted to LM338 to transfer the heat generated to the atmosphere.


Continue reading...

Simple Universal PIC Programmer

This easy programmer will settle for any device thats enhanceed by way of software program (eg, IC-Prog 1.05 by means of Bonny Gijzen at www.ic-prog.com). The circuit is primarily based partly on the ISP header described within the SILICON CHIP \"PIC Testbed\" mission but additionally features an exterior programming voltage provide for laptops and for different state of affairss the place the voltage present on the RS232 port is insufficient. This is completed the use of 3-terminal regulators REG1 & REG2. The PIC to be programmed can be hooked up on a protoboard. This makes advanced socket wiring to support more than one tools needless. 16F84A, 12C509, 16C765 and different softwares have all been used successfully with this instrument.

Circuit diagram:

Simple Universal PIC Programmer Circuit Diagram


http://www.ecircuitslab.com
Continue reading...

Versatile Micropower Battery Protector

Protect your expensive batteries from discharge damage with this mini-sized electronic cutout switch. It uses virtually no power and can be built to suit a wide range of battery voltages.
Main Features
  • Disconnects load at preset battery voltage
  • Automatically reconnects load when battery recharged
  • Ultra-low power consumption (<20ma)
  • Miniature size
  • 10A maximum rating
  • Suitable for use with 4.8-12.5V batteries
  • Transient voltage protection (optional)
Suitable for use in...
  • Cars, boats & caravans
  • Security systems
  • Emergency lighting
  • Small solar installations
  • Camera battery packs
  • Many other low-power applications
Picture of the project:
versatile-micropower-battery-protector-circuit1
versatile-micropower-battery-protector-circuit-backside 2
Back in May 2002, we (Silicon Chip) presented the "Battery Guardian", a project designed specifically for protecting 12V car batteries from over-discharge. This unit has proven to be very popular and is still available from kit suppliers. This new design does not supersede the Battery Guardian – at least not when it comes to 12V car batteries. Instead, it’s a more flexible alternative that can be used with a wide range of battery voltages.
Parts layout:
front-parts-layout-versatile-micropower-battery-protector-circuit 3
back-parts-layout-versatile-micropower-battery-protector-circuit 4
In this new "Micropower Battery Protector", we’ve dispensed with the low-battery warning circuitry and the relatively cheap N-channel MOSFET used in the Battery Guardian in favour of a physically smaller module that steals much less battery power. It costs a little more but can switch lower voltages, allowing it to be used with 6V & 12V lead-acid batteries and 4-cell to 10-cell NiCd and NiMH battery packs.
PCB layout:
pcb-layout-versatile-micropower-battery-protector-circuit 5
Most battery-powered equipment provides no mechanism for disconnecting the batteries when they’re exhausted. Even when the voltage drops too low for normal operation, battery drain usually continues until all available energy is expended. This is particularly true of equipment designed to be powered from alkaline or carbon cells but retro-fitted with rechargeables.
Circuit diagram:
versatile-micropower-battery-protector-circuit-diagram 6
Another example is emergency lighting and security equipment designed to be float-charged from the mains. In an extended blackout period, the batteries can be completely drained and may not recover when the mains power is finally restored.

Source:   http://www.ecircuitslab.com/2011/06/versatile-micropower-battery-protector.html
Continue reading...

Simple Car Battery Voltage Monitor Circuit

This circuit is used to monitor the battery voltage to show a twin-colored LED standing of the battery to. If the LED “green”battery voltage exceeds eleven.9 volts. If the yellow LED, battery voltage 11.9 to 11.5 volts. If the LED is “red” If the battery voltage beneath 11.5 volts. You can after all trade the set off factors with the support of the trimmer resistors and / or altering the value of the resistors in the divider.


A dual op amp is used as a comparator. The inexperienced LED on the board, except the voltage exceeds 11.5 volts. The crimson LED illuminates when the voltage falls below eleven.9 volts to the circuit. Therefore, in the 11.9 to 11.5 volts, both LEDs are on, producing a relatively yellow colour. When the voltage falls below 11.5 V, the inexperienced LED, and now only the purple LED flashes to point low voltage.

Electronic Parts List
R1=1K2
R2-3-4=680R
R5=15K
R6=10K
R7-8-9-10=1K
IC1=LM324
D1=5V6 /0.5W Zener
D2-3-4-5=LED
RV1=10K trimmer

Is really helpful that multi-shaper for V1 and V2. Muti-trimmer makes it a lot more straightforward to trigger points to make as a inexpensive single-turn trimmer. The trimmer can be totally eradicated when you have get right of entry to to a range of 1% resistors and has had calculated carefully. You would additionally need to present more correct reference voltage as the widespread 78L05 regulator.

Continue reading...

Electronic Fuse Employs A Relay

The hobby circuit below uses an unusual method to generate about 12,000 volts with about 5uA of current. Two SCRs form two pulse generator circuits. The two SCRs discharge a 0.047uF a 400v capacitor through a xenon lamp trigger coil at 120 times a second.

Circuit Project:12KV High Voltage Generator
 
The high voltage pulses produced at the secondary of the trigger coil are rectified using two 6KV damper diodes. The voltage doubler circuit at the secondary of the trigger coil charges up two high voltage disc capacitors up to about 12KV. Although this circuit can’t produce a lot of current be very careful with it. A 12KV spark can jump about 0.75 of an inch so the electronic circuit needs to be carefully wired with lots of space between components.


Source by : Streampowers
Continue reading...

Luminescent Generator

When spun rapidly between the fingers, a bipolar stepper motor will generate around 10VAC. If this is stepped up with a small 240V to 6-0-6V transformer in reverse (with series connected secondaries), a small bipolar stepper motor is capable of powering a standard 5cm by 6cm luminescent sheet at full brightness. These are designed to be powered from 20V to 200VAC (typically 115VAC), producing 1.5 candelas of light - which will dimly light the average room, or adequately light a camp table. They are manufactured by Seikosha (RS Components Cat. 267-8726).

Circuit diagram:
luminescent-generator-circuit diagram
Luminescent Generator Circuit Diagram

The transformer should be a small one (around 100mA or so), otherwise efficiency is compromised. The wires of the motors two phases are usually paired white & yellow and red & blue. Just one of these phases is employed in the circuit. If a small bipolar stepper motor from a discarded 3.5-inch disk drive is used, the Luminescent Generator may be built into a very small enclosure. To sustain rapid, smooth spinning of the motor, a geared handle may be added.


Source by : Streampowers
Continue reading...

Thursday, April 11, 2013

5 8 Watt audio power amplifier

5,8watt amplifier schematics
This amplifier circuit has a power output of a small or too low at 5.8 Watt, which uses IC KA2205. The required voltage for at least 6 volts to 18 volts DC maximum.


Schematics power audio amplifier with IC KA2205

low power amplifier
Component List
C1 = 1uF
C2 = 100uF
C3 = 47uF
C4 = 1000uF
C5 = 0.1uF
C6 = 220uF
IC1 = KA2205

Continue reading...

Fire alarm using thermistor NE555

Many fire alarm circuits are presented
here,but this time a new circuit using a thermistor and a timer to do
the trick. The circuit is as simple and straight forward so that, it
can be easily implemented. The thermistor offers a low resistance at
high temperature and high resistance at low temperature. This
phenomenon is employed here for sensing the fire.
The
IC1 (NE555) is configured as a free running oscillator at audio
frequency. The transistors T1 and T2 drive IC1. The output (pin 3) of
IC1 is couples to base of transistor T3 (SL100), which drives the
speaker to generate alarm sound. The frequency of NE555 depends on the
values of resistances R5 and R6 and capacitance C2. When thermistor
becomes hot, it gives a low-resistance path for the positive voltage to
the base of transistor T1 through diode D1 and resistance R2.
Capacitor C1 charges up to the positive supply voltage and increases
the the time for which the alarm is ON. The larger the value of C1, the
larger the positive bias applied to the base of transistor T1 (BC548).
As the collector of T1 is coupled to the base of transistor T2, the
transistor T2 provides a positive voltage to pin 4 (reset) of IC1
(NE555). Resistor R4 is selected s0 that NE555 keeps inactive in the
absence of the positive voltage. Diode D1 stops discharging of
capacitor C1 when the thermistor is in connection with the positive
supply voltage cools out and provides a high resistance path. It also
inhibits the forward biasing of transistor T1.
Circuit diagram with Parts list.
fire-alarm-circuit.jpg
Notes.
  • The circuit can be powered from a 6V battery or a 6V power supply.
  • Click Here ! for the circuit diagram of a power supply circuit for this project.
  • The thermistor can be mounted on a heat resistant material like mica to prevent it from damage due to excessive heat.
  • The LED acts as an indication when the power supply is switched ON.
Continue reading...

1999 Chevrolet Chevy 1500 Pu V6 Wiring Diagram

1999 Chevrolet Chevy 1500 Pu V6 Wiring Diagram


The Part of 1999 chevrolet Chevy 1500 Pu V6 Wiring Diagram:power distribution coil, A/C compressor fuse, ignition fuse, underhood bussed electrical center, high pressure cutout switch, A/C compressor clutch, A/C low pressure cycling switch, ground distribution, powertrain control module, vehicle control module, A/C automatic recirculating switch, HVAC control module.
Continue reading...

1995 KLR650 Dual Sport Motocross Wiring Diagram

1995 KLR650 Dual Sport Motocross Wiring Diagram

The Part of 1995 KLR650 Dual Sport Motocross Wiring Diagram: instrument cluster, ignition switch,
right front turn signal, front brake light switch, starter button, engine stop switch, water temperature sender, meter light, high beam indicator light, neutral indicator light, fan switch, cooling fan, voltage regulator rectifier, turn signal relay, brake tail light, license light, starter circuit relay, battery, chassis ground, starter relay, CDI, neutral switch, magneto, headlight switch, dimmer switch, turn signal switch, horn button, stand switch, ignition pick up coil, chassis ground, horn, headlight, turn signal.
Continue reading...

Simple Solar Flasher

This Simple Solar Flasher circuit is a single transistor fly back (Joule Thief) circuit that features a third coil. With it, flash duration and brightness is much enhanced, without resorting to large value capacitors.

Circuit Diagram:


Continue reading...

1994 Saturn sedan 1 9L Wiring Diagram

1994 Saturn sedan 1.9L Wiring Diagram
(click for full size image)

The Part of 1994 Saturn sedan 1.9L Wiring Diagram: cluth start switch, underhood junction block, nuetral start switch, ignition switch, power distribution, generator, fusible link, starter solenoid, near battery,
Continue reading...

Wednesday, April 10, 2013

12V Powered 12V Lead Acid Battery Charger with Indicator

Some of you might wonder why a charger is needed at all, to charge a 12 Volt battery from a 12 Volt source! Well, firstly the "12 Volt" source will typically vary anywhere from 11 Volt to 15 Volt, and then a battery needs a controlled charge current and voltage, which cannot result from connecting it directly to a voltage source. The charger described here is intended for charging small 12 Volt lead acid batteries, such as the gelled or AGM batteries of capacities between about 2 and 10 Ah, using a cars electrical system as power source, regardless of whether the car engine is running or not. I built this charger many years ago, I think I was still in school back then. On request of a reader of my web site, Im publishing it now, despite being a rather crude circuit.

12V Powered 12V Lead Acid Battery Charger with Indicator
It works, it is uncritical to build, and uses only easy-to-find parts, so it has something in its favor. The downside is mainly the low efficiency: This charger wastes about as much power as it puts into the battery. The charger consists of two stages: The first is a capacitive voltage doubler, which uses a 555 timer IC driving a pair of transistors connected as emitter followers, which in turn drive the voltage doubler proper. The doubler has power resistors built in, which limit the charging current. The second stage is a voltage regulator, using a 7815 regulator IC. Its output is applied to the battery via a diode, which prevents reverse current and also lowers the voltage a bit.

12V Powered 12V Lead Acid Battery Charger with Indicator
The resulting charge voltage is about 14.4V, which is fine for charging a gelled or AGM battery to full charge, but is too high as a trickle charger, so dont leave this charger permanently connected to a battery. If you would like to do just that, then add a second diode in series with D3! There is a LED connected as a charge indicator. It will light when the charge current is higher than about 150mA. The maximum charge current will be roughly 400mA. There is an auxiliary output, that provides about 20V at no load (depending on input voltage), and comes down as the load increases. I included this for charging 12V, 4Ah NiCd packs, which require just a limited current but not a limited voltage for charging.

12V Powered 12V Lead Acid Battery Charger with Indicator
Note that if the charge output is short-circuited, the overcurrent protection of U2 will kick in, but the current is still high enough to damage the diodes, if it lasts. So, dont short the output! If instead you short the auxiliary output, the fuse should blow. I built this charger into a little homemade aluminum sheet enclosure, using dead-bug construction style. Not very tidy, but it works. Note the long leads on the power resistors. They are necessary, because with shorter leads the resistors will unsolder themselves, as they get pretty hot! The transistors and the regulator IC are bolted to the case, which serves as heat sink. The transistors dont heat up very much, but the IC does.


Source by Streampowers
Continue reading...

Linear RF Power Meter Circuit

The National Semiconductor LMV225 is a linear RF power meter IC in an SMD package. It can be used over the frequency range of 450 MHz to 2000 MHz and requires only four external components. The input coupling capacitor isolates the DC voltage of the IC from the input signal. The 10-k? resistor enables or disables the IC according to the DC voltage present at the input pin. If it is higher than 1.8 V, the detector is enabled and draws a current of around 5–8 mA. If the voltage on pin A1 is less than 0.8 V, the IC enters the shutdown mode and draws a current of only a few microampères. The LMV225 can be switched between the active and shutdown states using a logic-level signal if the signal is connected to the signal via the 10-kR resistor.
Circuit diagram:
linear-rf-power-meter-circuit-diagram1 Linear RF Power Meter Circuit Diagram
 
The supply voltage, which can lie between +2.7 V und +5.5 V, is filtered by a 100nF capacitor that diverts residual RF signals to ground. Finally, there is an output capacitor that forms a low-pass filter in combination with the internal circuitry of the LMV225. If this capacitor has a value of 1 nF, the corner frequency of this low-pass filter is approximately 8 kHz. The corner frequency can be calculated using the formula fc = 1 ÷ (2 p COUT Ro) where Ro is the internal output impedance (19.8 k?). The output low-pass filter determines which AM modulation components are passed by the detector.

rf-power-meter-circuit-diagram2 
The output, which has a relatively high impedance, provides an output voltage that is proportional to the signal power, with a slope of 40 mV/dB. The output is 2.0 V at 9 dBm and 0.4 V at –40 dBm. A level of 0 dBm corresponds to a power of 1 mW in 50 R. For a sinusoidal wave-form, this is equivalent to an effective voltage of 224 mV. For modulated signals, the relationship between power and voltage is generally different. The table shows several examples of power levels and voltages for sinusoidal signals. The input impedance of the LMV225 detector is around 50 R to provide a good match to the characteristic impedance commonly used in RF circuits.

The data sheet for the LMV225 shows how the 40-dB measurement range can be shifted to a higher power level using a series input resistor. The LMV225 was originally designed for use in mobile telephones, so it comes in a tiny SMD package with dimensions of only around 1 × 1 mm with four solder bumps (similar to a ball-grid array package). The connections are labelled A1, A2, B1 and B1, like the elements of a matrix. The corner next to A1 is bevelled.


http://streampowers.blogspot.com/2012/06/linear-rf-power-meter-circuit.html 
Continue reading...

Build A Split Supply Generator

Occasionally a designer needs a dual power supply to power a circuit that is operating with signals near or at ground but the only available supply is a single polarity, usually positive. Many excellent IC solutions are available but a suitable solution for many projects may be constructed from "junk box" parts. The simple circuit below will generate about 9 volts and -4 volts from a single 5 volt supply with sufficient current to power a simple op-amp circuit. The positive voltage drops to about 7 volts when supplying 7 mA and the negative voltage drops to about 3.5 volts when supplying 3.5 mA (1k loads). Although this isnt exactly a +- 15 volt supply, this is plenty of voltage and current for many op-amp circuits and will allow the output of most op-amps to swing below zero volts and will allow most op-amp inputs to measure voltages below zero volts. This circuit uses the CD4049 which is a high current version of the CD4069 which will also work with somewhat lower current capability.
Split Supply Generator Circuit Diagram
Split Supply Generator

The two inverters on the left generate a square wave and the other four inverters are connected in parallel to increase the current drive to the diodes. The diode on top clamps the voltage on the top capacitor at about 4.5 volts when the inverters go low. When the inverters go high, their output voltage is added to the 4.5 volts to give about 9.5 volts. The second diode rectifies this voltage to give a little over 9 volts on the output. The bottom two diodes work in the same way only the voltage on the first capacitor is clamped to about 0.5 volts on the positive swing and then goes down to about -4.5 volts on the negative swing of the inverters, giving about -4 volts out.

The prototype is operating at only 500 Hz to allow for the use of some old-fashioned germanium rectifiers that I have in large numbers. If more modern schottky rectifiers are used the frequency may be set higher by lowering the .001uF capacitor or the 1 megohm resistors. The 4, 330 uF capacitors are larger than necessary and a few uF will suffice if the frequency is raised to, say, 5 kHz (try 100k resistors or a 100pF capacitor).   Yep, I have a lot of those 330 uF capacitors, too. In fact, I have a few thousand of the CD4049, if you would like a few. (charles@wenzel.com)
Split Supply Generator 
This little circuit is going into a sub-picoampere leakage meter for characterizing JFETs and other components for extremely high impedance circuits.
Continue reading...

Simple 7805 Voltage Regulator Circuit

A voltage regulator is used to produce a constant linear output voltage. It’s generally used with AC to DC power supply. And also it can be used as well as a DC to DC voltage converter . To regulating low voltage, most used device is one single IC. 7805, 7812, 7905 etc. 78xx series are design for positive and 79xx series are for Negative voltage regulator.

7805 is a three terminal +5v voltage regulator IC from 78XX chips family. See 7805 pinout below. LM78XX series are from National Semiconductor. They are linear positive voltage regulator IC; used to produce a fixed linear stable output voltage.  National Semiconductor has also negative voltage regulator chips family, they indicate with LM 79XX. 78xx is used more than 79xx because negative voltage has a few usability purposes as we see.
I was previously posted a 5v regulated power supply circuit using 7805 IC, that circuit and this 7805 voltage regulator circuit is almost the same.
 
 
Its output voltage is +5V DC that we need. You can supply any voltage in input; the output voltage will be always regulated +5V. But my recommendation is, don’t supply more than 18V or less than 8V in input. There used two capacitors in this voltage regulator circuit, they aren’t mandatory to use. But it will be best if you use them. They helped to produce a smooth regulated voltage at output. Use electrolyte capacitor instead of ceramic capacitor.

One limitation of 7805 I have found that is its output current 1A maximum. Otherwise it is a good voltage regulator if you are happy with 1A. But if   you need over 400mA current in output then you should use a Heat Sink with IC LM7805. Otherwise it may fall damage for overheating.Link
 
Continue reading...

Fuse Box Ford 66 Montego Diagram

Fuse Box Ford 66 Montego Diagram - Here are new post for Fuse Box Ford 66 Montego Diagram.

Fuse Box Ford 66 Montego Diagram


Fuse Box Ford 66 Montego Diagram

Fuse Panel Layout Diagram Parts: terminal, fuse emergency flasher, cigar lighter, clock feed, fuse panel, fuse courtesy, dome, cargo, luggage, glove compartment lamp, instrument panel, cluster lamps, .fuse heater, warning lamps, seat belt warning, brake warning, brake warning, air conditioning, windshield washer, accessory feed.
Continue reading...

Pc Temperature Alarm

If your PC overheats, it could damage its expensive components. Here’s a circuit that warns you of your PC getting heated. Today’s computers contain most of the circuitry on just a few chips and reduced power consumption is a byproduct of this LSI and VSLI approach. Some PCs still have power supplies that are capable of supplying around 200W, but few PCs actually consume power to this extent.

On the other hand, apart from some portable and small desktop computers that use the latest micro-power components, most PCs still consume significant amount of power and generate certain amount of heat.  The temperature inside the aver-age PC starts to rise well above the ambient temperature soon after it is switched on. Some of the larger integrated circuits become quite hot and if the temperature inside the PC rises too high, these devices may not be able to dissipate heat fast enough. This, in turn, could lead to failure of devices and eventually of the PC.  Various means to combat overheating are available, ranging from simple temperature alarms to devices like temperature-activated fans to keep the microprocessor cool.

Here is a temperature alarm that activates an audio ‘beeper’ if the temperature inside the PC exceeds a preset threshold. This temperature is user-adjustable and can be anywhere between 0°C and 100°C.  The unit is in the form of a small PC expansion card, which you simply need to plug into any avail-able slot of the host PC. It is powered from the PC and consumes only about 12 mA.  The sensor (LM35) used here pro-vides a substantial amount of on-chip signal conditioning, including amplification, level shifting and phase in-version. As a result, it provides an out-put of 10 mV per degree centigrade rise in temperature. It caters to a temperature measurement range of 0°C to 100°C, which corresponds to 0V to 1V of voltage.

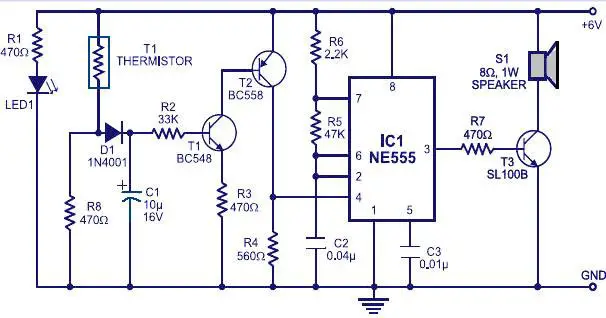
Pc Temperature Alarm Circuit Diagram

Pc Temperature Alarm-Circuit Diagram

The voltage-detector stage com-pares the output voltage of the temperature sensor with the preset reference voltage. The output of the comparator goes high if the output potential from the sensor exceeds the reference voltage. When this happens, the voltage comparator enables a low-frequency oscillator, which, in turn, activates the audio oscillator. The out-put of the audio oscillator is connected to a loudspeaker (LS1), which sounds a simple ‘beep-beep’ alarm. The reference voltage determines the temperature at which the alarm is activated.

Fig. 1 shows the circuit of the PC temperature alarm and Fig. 2 shows the pin configuration of sensor LM35. IC LM35 (IC1) is an easy-to-use temperature sensor. It is basically a three-terminal device (two supply leads plus the output) that operates over a wide supply range of 4 to 20V. It consumes only 56 µA at 5V and generates insignificant heat.

IC2 is an operational amplifier used here as a voltage comparator. VR1 pro- vides a reference voltage that can be set anywhere from 0V to approximately 1V, which matches the output voltage range of IC1. This reference voltage is applied to the inverting in- put of IC2 and the output of IC1 is coupled to the non-inverting input. Consequently, the output of IC2 is low if the output of IC1 is below the reference voltage, or high if the output of IC1 exceeds the reference voltage.

Pin details of LM35

Pin

The low-frequency oscillator IC3 is a standard 555 astable multivibrator circuit. It is gated via the reset input at pin 4, which holds output pin 3 low when IC3 is gated ‘off’ (when the out-put of IC2 is low). This prevents IC4 from oscillating. IC4 is another 555 astable multivibrator circuit, gated via its reset input. It has an operating frequency of approximately 2.5 kHz.  When IC3 is activated, its output pro-vides a square wave of 1 Hz. This is used to trigger IC4, which gives an audio output of 2.5 kHz in bursts. It is connected to loudspeaker LS1 to generate alarm.

The alarm circuit can be fitted into any spare expansion slot of the PC, but be careful to fit it the right way round. Before setting VR1 to a suitable thresh-old temperature, decide what that temperature should be. The technical specification in your computer’s manual might be of help here.  If we assume that the room temperature will not normally exceed 25oC, the temperature of the interior of the computer would be up to 35oC. Unless you have good reason to use a different threshold temperature, VR1 should be set for a wiper potential of 350 mV.

Trial-and-error method can be used in the absence of test equipment to enable VR1, but it would be a bit time-consuming. There is a slight complication in that the computer’s outer casing must be at least partially removed to provide access to VR1. Once VR1 has been adjusted, the outer casing must be put back into place so that the interior of the computer can warm up in the normal way. You must therefore al-low time for the temperature inside the computer to rise back to its nor-mal operating level each time VR1 is readjusted.

Source:  http://www.ecircuitslab.com/2012/05/pc-temperature-alarm.html
Continue reading...

Tuesday, April 9, 2013

Flugzeugepiper 32rt Lance

Piper Aircraft on Aerostar Aircraft History Performance And Specifications
Aerostar Aircraft History Performance And Specifications.


Piper Aircraft on This Aircraft Will Not Be Finished In The Traditional Cub Yellow But
This Aircraft Will Not Be Finished In The Traditional Cub Yellow But.


Piper Aircraft on Flugzeuge De   Piper Saratoga Tc Ln Aaf Cockpit
Flugzeuge De Piper Saratoga Tc Ln Aaf Cockpit.


Piper Aircraft on Flugzeuge De   Piper Pa 32rt 300 Lance Ii
Flugzeuge De Piper Pa 32rt 300 Lance Ii.


Piper Aircraft on Flugzeuge De   Piper Pa 46 350p Malibu Mirage
Flugzeuge De Piper Pa 46 350p Malibu Mirage.


Piper Aircraft on Flugzeuge De   Pa 28 181 Archer Ii
Flugzeuge De Pa 28 181 Archer Ii.


Piper Aircraft on Origin United States Of America Manufacturer Piper Aircraft First
Origin United States Of America Manufacturer Piper Aircraft First.


Piper Aircraft on Flugzeuge De   Piper Pa 42 720 Cheyenne Iiia
Flugzeuge De Piper Pa 42 720 Cheyenne Iiia.


Piper Aircraft on Piper Pa 28 181 Flugzeug Zu Verkaufen   Ad Idno  100580   Aircraft24
Piper Pa 28 181 Flugzeug Zu Verkaufen Ad Idno 100580 Aircraft24.


Piper Aircraft on Civil Fabricante Piper Aircraft Introducido 1960 Estado En Servicio N
Civil Fabricante Piper Aircraft Introducido 1960 Estado En Servicio N.


Continue reading...

Voltage Tester for Model Batteries

With a suitable load, the terminal voltage of a NiCd or lithium-ion battery is proportional to the amount of stored energy. This relationship, which is linear over a wide range, can be used to build a simple battery capacity meter.
Circuit Image :
 Voltage Tester for Model Batteries Image
Voltage Tester for Model Batteries Circuit Image 
This model battery tester has two functions: it provides a load for the battery, and at the same time it measures the terminal voltage. In addition, both functions can be switched on or off via a model remote-control receiver, to avoid draining the battery when it is not necessary to make a measurement. The load network, which consists of a BC517 Darlington transistor (T2) and load resistor R11 (15 Ω /5 W), is readily evident. When the load is active, the base of T1 lies practically at ground level. Consequently, T1 conducts and allows one of the LEDs to be illuminated.
Circuit Diagram :
Voltage Tester for Model Batteries-Circuit Diagram
Voltage Tester for Model Batteries Circuit Diagram
The thoroughly familiar voltmeter circuit, which is based on the LM3914 LED driver, determines which LED is lit. The values of R6 and R7 depend on the type and number of cells in the battery. The objective here is not to measure the entire voltage range from 0 V, but rather to display the portion of the range between the fully charged voltage and the fully discharged voltage. Since a total of ten LEDs are used, the display is very precise. For a NiCd battery with four cells, the scale runs from 4.8 V to 5.5 V when R6 = R7 = 2 kΩ. The measurement scale for a lithium-ion battery with two cells ranges from 7.2 V to 8.0 V if R6 = 2 kΩ and R7 = 1 kΩ.
For remote-control operation, both jumpers should be placed in the upper position (between pin 1 and the middle pin). In this configuration, either a positive or negative signal edge will start the measurement process. A positive edge triggers IC1a, whose output goes High and triggers IC1b. A negative edge has no effect on IC1a, but it triggers IC1b directly. In any case, the load will be activated for the duration of the pulse from monostable IC1b. Use P12 to set the pulse width of IC1a to an adequate value, taking care that it is shorter than the pulse width of IC1b.
If the voltage tester is fitted into a remote-controlled model, you can replace the jumpers with simple wire bridges. However, if you want to use it for other purposes, such as measuring the amount of charge left in a video camera battery, it is recommended to connect double-throw push-button switches in place of JP1 and JP2. The normally closed contact corresponds to the upper jumper position,while the normally open contact corresponds to the lower position.
Parts :
Resistors:
R1,R2 = 47kΩ
R3 = 100kΩ
R4 = 500kΩ
R5 = 1kΩ
R6,R7 = see text (1% resistors!)
R8 = 1kΩ5
R9 = 1kΩ2
R10 = 330Ω
R11 = 15Ω 5W
R12 = 15kΩ
P1 = 100kΩ preset
Capacitors:
C1 = 10nF
C2 = 100nF
Semiconductors:
D1-D10 = LED, red, high effi-ciency
T1 = BC557
T2 = BC517
IC1 = 74HC123
IC2 = LM3914AN
Miscellaneous:
PC1,PC2,PC3 = solder pin
JP1,JP2 = jumper or pushbutton
PCB Layout :
B. PCB Laout
Voltage Tester for Model Batteries PCB Layout


Continue reading...