Showing posts with label diagram. Show all posts
Showing posts with label diagram. Show all posts
Friday, January 10, 2014
The High Voltage Geiger Counter Supply Circuit Diagram
This High Voltage Geiger Counter Supply Circuit Diagram will generate about 300 volts dc —at a very low current, but enough for a GM tube. be careful with the output.
High Voltage Geiger Counter Supply Circuit Diagram

High Voltage Geiger Counter Supply Circuit Diagram

Wednesday, December 25, 2013
Off line Fly back Regulator Circuit Diagram
This Off line Fly back Regulator Circuit Diagram uses a low-cost feedback scheme in which the dc voltage developed from the primary-side control winding is sensed by the UC1842 error amplifier. Load regulation is therefore dependent on the j coupling between secondary and control windings, and on transformer leakage inductance.
For applications requiring better load regulation, a UC1901 Isolated Feedback Generator can be used to directly sense the output voltage.
Off line Fly back Regulator Circuit Diagram

Tuesday, December 24, 2013
TV audio video transmitter Schematic Diagram
This is a simple TV audio video transmitter circuit can be constructed using this schematic diagram . This TV audio video transmitter circuit can be used to transmit video signals from VCR ( or some other device ) to a TV without using any cable .
Video signals input at jack J1 are first terminated by resistor R6 and coupled through capacitor C1 to clamping-diode D1. Potentiometer R3 is used to set the gain of the video signal; its effect is similar to that of the contrast control on a TV set.
TV audio video transmitter Schematic Diagram

Bias-control R7 can be used to adjust the black level of the picture so that some level of signal is transmitted, even for a totally dark picture.
RF-transformer T1 and its internal capacitor form the tank circuit of a Hartley oscillator thats tuned to 4.5 megahertz. Audio signals input at J2 are coupled to the base of Q3 via C2 and R4: the audio signal modulates the base signal of Q3 to form an audio subcarrier that‚s 4.5-megahertz higher than the video-carrier frequency.
The FM modulated subcarrier is applied to the modulator section through C5 and R9.
Resistor R9 adjusts the level of the subcarrier with respect to the video signal.
Resistor R9 adjusts the level of the subcarrier with respect to the video signal.
Transistors Q1 and Q2 amplitude modulate the video and audio signals onto an RF-carrier signal. The operating frequency is set by coil L4, which is 3.5 turns of 24- gauge enameled wire on a form containing a standard ferrite slug.
The RF output from the oscillator (L4, C7 and C9 ) section is amplified by Q5 and Q6, whose supply voltage comes from the modulator . Antenna matching and low-pass filtering is performed by C12, C13, and L1.
Resistor R12 is optional; it is added to help match the output signal to any kind of antenna.
To align this audio video transmitter you need to tune a TV receiver to an unused channel between 2 and 6. The TV must have an indoor antenna connected directly to it; an outdoor antenna or cable wont work. Make sure both potentiometers (R3, R7) are in middle position and apply power to the transmitter. Adjust L4 with a nonmetallic tool until the TV screen goes blank ,then fine-adjust L4 for the "most-blank" picture.
Connect the video and audio outputs from a VCR(AV source) to jacks J1 and J2 (respectively) of the transmitter .
After that you should see a picture on the TV screen: if you do, readjust L4 for the best picture; if you dont, check the board for any bad connections. Next, adjust R3 for the best picture brightness and R7 for the best overall picture.
Finally, adjust T1 with a nonmetallic tool for the best sound .
The TV transmitter combines line level audio and video signals, and transmits the resulting signal up to 300 feet. The circuit can be powered from a 9-12V power supply circuit .
Monday, December 23, 2013
Power Mosfet Inverter Circuit Diagram
This Power Mosfet Inverter Circuit Diagram can deliver .high-voltage ac or dc, with a rectifier and filter, up to several hundred volts. The secondary and primary of T1-a 12.6 to 440 V power transformer, respectively-are reversed; e.g., the primary becomes the secondary and the secondary becomes the primary. Transistors Q1 and Q2 can be any power FET. Be sure to heat sink Q1 and Q2. Capacitors C1 and C2 are used as spike suppressors.
Power Mosfet Inverter Circuit Diagram

Sunday, December 22, 2013
10A Stabilized Circuit Diagram
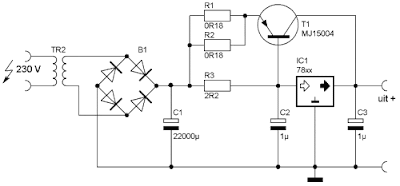
This is a heavier power supply that can deliver. 10A stabilized. The circuit is built around a normal 78xx controller, but for extra power equipped with T1.For the 78xx can be taken any type. Keep in mind that the input voltage of the regulator, as the output-voltage.
3V higher See 78xx power for the available controllers.T1 must be mounted on a large heatsink when installing large capacity decreased.A negative variant of this food can be found here.
10A Stabilized Circuit Diagram
Warning: This diet is not short circuit proof.
Parts List
R1, R2 = 0.18 Ω 5W
R3 = 2.2 Ω 2W
C1 = 22000μF
C2, C3 = 1μF
B1 = 35A
T1 = MJ15004
IC1 = 78xx
Saturday, December 21, 2013
Precision Voltage Inverter Circuit Diagram
This Precision Voltage Inverter Circuit Diagram allows a reference to be inverted with 1 ppm accuracy, features high input impedance, and requires no trimming.
Precision Voltage Inverter Circuit Diagram

Thursday, December 19, 2013
Fluorescent Light Wiring Diagram Tube Light Circuit
This post "Fluorescent Light Wiring Diagram | Tube Light Circuit" is about how to wiring fluorescent light and "how a Fluorescent Tube Light works". The wiring process of fluorescent tube lamp/light with Ballast,Starter is quite easy and simple. In most cases when we buy a fluorescent light it comes in a complete set with all wire connected. If you want do it yourself (DIY), you can buy all the parts individually. And you can complete all connection of the fluorescent light/lamp with the help of this wiring circuit diagram.
Fluorescent Light Wiring Diagram
 |
| Fig: Fluorescent Light Wiring Diagram |
Main parts of Fluorescent Tube Light:
1.Fluorescent Tube
2.Ballast
3.Starter
4.Holder, wire etc.
How Fluorescent Lights works:
The starter is like a key of fluorescent light because it is used to light up the tube. When we connect the AC supply voltage to the circuit, then the starter act like short circuited and current flow through those filament (located at the first and second end of the tube light) and the filament generate heat and it ionized the gas (mercury vapor) in the fluorescent tube lamp. So the gas becomes electrically conductive medium. At the same time when the starter opened the circuit path of two filaments from series connected, then the ballast release its stored voltage. And it makes the fluorescent tube fully lighten. Now the starter has no job in the circuit, if you open it from the circuit the fluorescent tube light will be still lighten, until you release the main supply.
Wednesday, December 18, 2013
Simple 8 Amp Regulated Power supply Circuit Diagram
This Simple 8-Amp Regulated Power supply Circuit Diagram is powered by a transformer operating from 120 Vac on the primary and providing approximately 20 Vac on the primary, and providing approximately 20 Vac on the secondary. Four 10-A diodes with a 100 PIV rating are used in a full-wave bridge rectifier. A 10,000 ^F/36 Vdc capacitor completes the filtering, providing 28 Vdc.
The dc voltage is fed to the collectors of the Darling-ton connected 2N3055s. Base drive for the pass transistors is from pin 10 of the µ723 through a 200 ohm current limiting resistor, Rl. The reference terminal (pin 6) is tied directly to the non-inverting input of the error amplifier (pin 5), providing 7.15 V for comparison. The inverting input to the error amplifier (pin 4) is fed from the center arm of a 10 k ohm potentiometer connected across the output of the supply.
Simple 8-Amp Regulated Power supply Circuit Diagram

This control is set for the desired output voltage of 13.8 V. Compensation of the error amplifier is accomplished with a 500 pF capacitor connected from pin 13 to pin 4. If the power supply should exceed 8 A or develop a short circuit, the µ723 regulator will bias the transistors to cutoff and the output voltage will drop to near zero until the short circuit condition is corrected.
Wednesday, June 5, 2013
Wiring Diagram Anti Lock Brake Mazda B4000 2002

Here Is A Typical Schematic Of Bentley Parrot 3200 Ls Wiring Diagram.

Wiring Diagram.

Volvo Wiring Diagrams 1994 2010 Volvo Wds 2010.

Illustrates The 1994 Honda Accord Fog Lamps Circuit Wiring Diagram.

Wiring Diagram Symbols.

Wiring Diagram 1969 Camaro Wiring Diagram 1989 Camaro Wiring Diagram.

Led Wiring Diagram Neon Wiring Diagrams.

Wiring Diagram Anti Lock Brake For Mazda B4000 2002.

Corolla Alternator Wiring Diagram Externally Regulated Jpg.

Wt 9002 Wiring Diagram Jpg.
Trailer Wiring Diagram Connectors Pinoutcircuit Schematic

Typical 7 Way Trailer Wiring Diagram Circuit Schematic.

Trailer Wiring Diagrams Johnson Trailer Sales Colfax Wisconsin.

Way Trailer Wiring Diagram And Connectors Pinout Circuit Schematic.

Post It But I Ll Try To Diagram It Here.

Pj Trailers Plug Diagram.

Troubleshooting Trailer Wiring.

Trailer Wiring Diagrams Johnson Trailer Sales Colfax Wisconsin.

This Allows You To Connect Up The Wiring To Tow A Caravan Or Trailer.

Wiring Colors Http Www Tridenttrailers Com Trailer Wiring Diagram Htm.

Trailer Wiring Diagrams Johnson Trailer Sales Colfax Wisconsin.
Tuesday, June 4, 2013
Audi Quattro Wiring Diagram Electrical Schematic 2004circuit

Direct Download Skoda Fabia 1 4 Wiring Diagram From Dl4all.

Wiring Diagram Here Free Download Pdf File Source Mediafire.

Tercel Electrical System Wiring Diagram Download Document Buzz.

Posts Related To 1991 Mitsubishi Pickup System Wiring Diagram Download.

Clarion Apa1100 Car Audio Amplifier Wiring Diagram Circuit Schematic.

Wiring Diagram Electrical Circuit 2004 Here Free Download 12.

Audi Quattro Wiring Diagram And Electrical Schematic 2004 Circuit.

Direct Download Dastek Unichip Wiring Diagram From Dl4all.

1966 Vw Beetle 1300 Wiring Diagram Thumbnail.

Ford Probe 95 Audio Sestym Wiring Diagram.
Monday, June 3, 2013
Trailer Wiring Diagram Informationtridentuk
Way Trailer Wiring Diagram And Connectors Pinout Circuit Schematic.

Chevrolet Pickup C1500 Wiring Diagram And Electrical Schematics 1997.

Ktm 250 525 Sx Mxc Exc Electrical System And Wiring Diagram.

Wiring Diagram For 2002 Bajaj Legend Circuit Schematic.

Chevrolet Blazer Wiring Diagram Schematics Circuit Png.

Toyota Tacoma Electrical Wiring Diagram Circuit Schematic.

1995 Chevrolet Tahoe Blazer Electrical Wiring Diagram.

Ford Ranger Wiring Diagram Electrical System Circuit 2001.

Trailer Wiring Diagram And Information Tridentuk Com.

Tractor Trailer Wiring Diagram Trailer Connector Wiring Trailer.
Sunday, June 2, 2013
Honda Accord Coupe Controls Circuit Wiring Diagram

Left Headlight 2 Left Parking Light 3 Right Parking Light 4 Right.
Ktm 250 525 Sx Mxc Exc Electrical System And Wiring Diagram.

Wiring Diagram Here Page 1 And Page 2 Source Autolib Diakom.

System And Wiring Diagram Here 60 Pages Of Pdf File Docs.

The Following Schematic Shows A Typical Diagram Schematic Of Polaris.
Anti Theft System And Alarm Circuit Wiring Diagram Circuit Schematic.

Honda Accord Coupe 94 Fan Controls Circuit And Wiring Diagram.

Cassette Cd And 6 Speakers Audio System Wiring Circuit Schematic.

Ford Factory Stereo Radio Wiring Harness 1996 1997 Ebay.

Jeep Grand Cherokee Radio Adaptor Wiring Harness Circuit Schematic.
Subscribe to:
Posts (Atom)